This is default featured slide 1 title

Go to Blogger edit html and find these sentences.Now replace these sentences with your own descriptions.

This is default featured slide 2 title

Go to Blogger edit html and find these sentences.Now replace these sentences with your own descriptions.

This is default featured slide 3 title

Go to Blogger edit html and find these sentences.Now replace these sentences with your own descriptions.

This is default featured slide 4 title

Go to Blogger edit html and find these sentences.Now replace these sentences with your own descriptions.

This is default featured slide 5 title

Go to Blogger edit html and find these sentences.Now replace these sentences with your own descriptions.

Showing posts with label Linux. Show all posts

Monday, May 18, 2020

How To install BitWarden

Open Source Password Manager for Individuals and Teams | Bitwarden

SYSTEM REQUIREMENTS

  • Processor: x64, 1.4GHz or faster
  • Memory: 2GB of RAM or more
  • Storage: 10GB or more
  • Docker: Engine 1.8+ and Compose 1.17.1+


INSTALL DOCKER


Open a terminal window and type:
sudo apt-get update
Allow the operation to complete.
sudo apt install docker.io


Installing Docker Compose

sudo curl -L https://github.com/docker/compose/releases/download/1.21.2/docker-compose-`uname -s`-`uname -m` -o /usr/local/bin/docker-compose

apt install docker-compose

INSTALL BITWARDEN

  1. Download the main Bitwarden script to your machine in the desired location:

     NOTE

    All Bitwarden assets will be installed in the ./bwdata directory relative to where the main Bitwarden script resides.
      Bash
    curl -Lso bitwarden.sh https://go.btwrdn.co/bw-sh \
        && chmod +x bitwarden.sh
    
     PowerShell
    Invoke-RestMethod -OutFile bitwarden.ps1 `
        -Uri https://go.btwrdn.co/bw-ps
    
  2. Start the installer:
      Bash
    ./bitwarden.sh install
    
     PowerShell
    .\bitwarden.ps1 -install
    
  3. Complete the prompts in the installer.
  4. Environment Variables
    Some features such as a SMTP mail server settings, YubiKey OTP API credentials, HaveIBeenPwned (HIBP) breach report API key, etc. are not configured by the installer. You can find the environment file for these settings (and all others) in the following location: ./bwdata/env/global.override.env. Edit this file and REPLACE the placeholders values for them.
    Example:
    globalSettings__mail__smtp__host=smtp.sendgrid.net
    globalSettings__mail__smtp__port=587
    globalSettings__mail__smtp__ssl=false
    globalSettings__mail__smtp__username=apikey
    globalSettings__mail__smtp__password=SG.YOUR.API_KEY
    
      Bash
    ./bitwarden.sh start
    
     PowerShell
    .\bitwarden.ps1 -start


Share:

Saturday, May 9, 2020

How to Install Matrix Synapse Chat on Ubuntu 18.04 LTS

How to Install Matrix Synapse Chat on Ubuntu 18.04 LTS

On this page

  1. Prerequisites
  2. What we will do?
  3. Step 1 - Update and Upgrade System
  4. Step 2 - Install Matrix Synapse
  5. Step 3 - Configure Matrix Synapse
  6. Step 4 - Generate SSL Letsencrypt Certificates
  7. Step 5 - Install and Configure Nginx as a Reverse Proxy
  8. Step 6 - Setup UFW Firewall
  9. Step 7 - Create a New Matrix User
  10. Step 8 - Testing
  11. Reference
Matrix is a new ecosystem for decentralized communication in real time for open federated instant messaging and VoIP services. It provides RESTful HTTP JSON APIs for building distributed and federated chat servers with no single point of control and failure and provides all references for the APIs.

Synapse is an implementation of the matrix home server that's created by matrix team and written in Python/Twisted. With this software, we can implement the matrix way for decentralized communication, we can create our own home server and store all user personal info, chat history, create the room for own use, etc.

In this tutorial, we will show you step-by-step how to install and configure Matrix Synapse on Ubuntu 18.04. We will configure Matrix Synapse on the local IP address, and configure the Nginx web server as a reverse proxy for it, and implement the HTTPS connection between clients and the front-end Nginx web server.

Prerequisites

  • Ubuntu 18.04
  • Root privileges
  • Matrix Domain name or sub-domain - matrix.hakase-labs.io

What we will do?

  1. Update and Upgrade the Ubuntu 18.04 System
  2. Install Matrix Synapse
  3. Configure Matrix Synapse
  4. Generate SSL Letsencrypt
  5. Install and Configure Nginx as a Reverse proxy for Matrix Synapse
  6. Setup UFW Firewall
  7. Setup New Matrix User
  8. Testing

Step 1 - Update and Upgrade System

Login to your Ubuntu server, update the repository and upgrade all packages using the apt command below.
sudo apt update
sudo apt upgrade
And all ubuntu packages have been upgraded.

Step 2 - Install Matrix Synapse

In this step, we will install the matrix synapse software using the Debian packages from the official matrix repository.
Add the matrix key and repository by running all commands below.
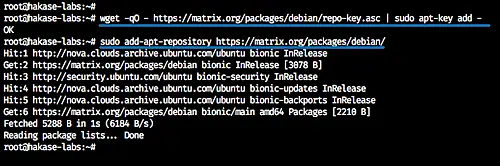
wget -qO - https://matrix.org/packages/debian/repo-key.asc | sudo apt-key add -
sudo add-apt-repository https://matrix.org/packages/debian/
The command will automatically update the repository.
Install Matrix Synapse
Now install matrix synapse using the apt command as below.

sudo apt install matrix-synapse -y
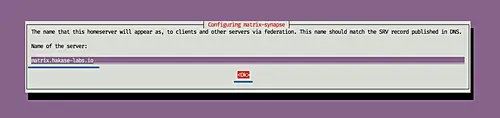
During the installation, it will ask you about the matrix server name - type the matrix domain name 'matrix.hakase-labs.io'.
Matrix synapse apt installer - part 1
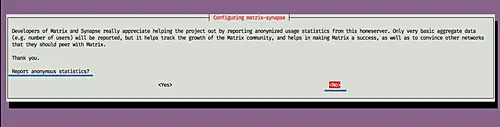
And for the anonymous data report, choose 'No'.
Matrix synapse apt installer - part 1
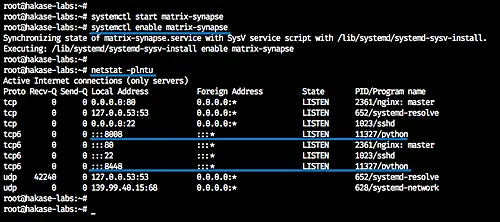
When the matrix synapse installation is complete, start the service and enable it to launch everytime at system boot.
sudo systemctl start matrix-synapse
sudo systemctl enable matrix-synapse
The matrix synapse is now up and running using the default configuration on port '8008' and '8448'. Check using netstat command.
netstat -plntu
Check open ports

Step 3 - Configure Matrix Synapse

After the matrix synapse installation, we will configure it to run under the local IP address, disable matrix synapse registration, and enable the registration-shared-secret.
Before editing the home server configuration, we need to generate the shared secret key.
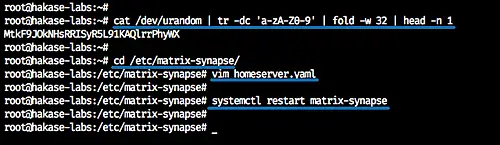
Run the command below.cat /dev/urandom | tr -dc 'a-zA-Z0-9' | fold -w 32 | head -n 1
And you will get the generated key. Copy the result key.
Now we need to edit the home server configuration file 'homeserver.yaml' on the '/etc/matrix-synapse/' directory. Change the current directory to '/etc/matrix-synapse' and edit the configuration file using vim.
cd /etc/matrix-synapse/
vim homeserver.yaml
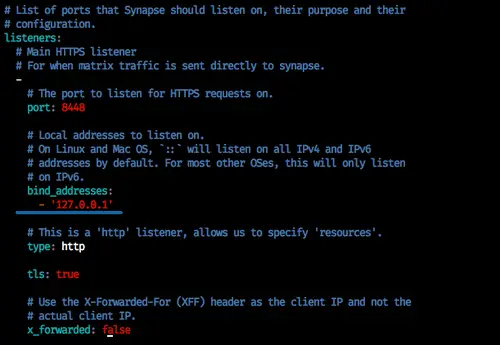
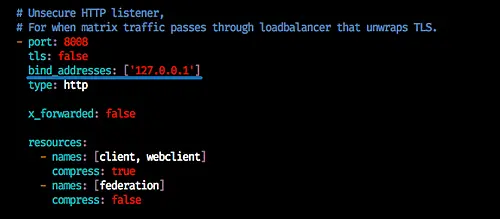
Change the HTTP and HTTPS Listener port '8008' and '8448' to the local IP address '127.0.0.1'.
    port: 8448
    bind_addresses:
      - '127.0.0.1'

    - port: 8008
    bind_addresses: ['127.0.0.1']
Matrix Synapse configuration
Matrix Synapse port config
Disable the matrix synapse registration, uncomment the 'registration_shared_secret' configuration and paste the secret key generated.
enable_registration: False
registration_shared_secret: "MtkF9JOkNHsRRISyR5L91KAQlrrPhyWX"
Save and exit.
Note:
registration_shared_secret: If set allows registration by anyone who also has the shared secret, even if registration is disabled.
Now restart the matrix synapse services.
sudo systemctl restart matrix-synapse
restart matrix-synapse
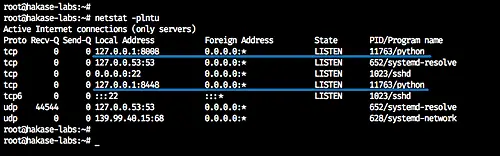
Check the homeserver service using the command below.
netstat -plntu
You will get the matrix synapse service is now on the local IP address.
Check Matrix Synapse Ports
And we have completed the matrix synapse installation and configuration.

Step 4 - Generate SSL Letsencrypt Certificates

In this tutorial, we will enable HTTPS for the Nginx reverse proxy, and we will generate the SSL certificate files from Letsencrypt.
Install the letsencrypt tool using the apt command below.
sudo apt install letsencrypt -y
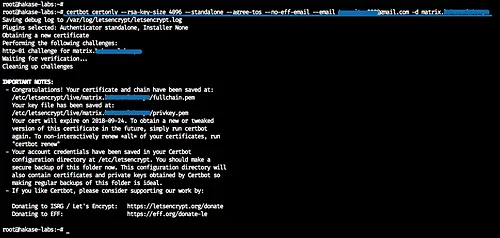
The Letsencrypt tool is installed on the system, now generate the SSL certificate files for the matrix domain name 'matrix.hakase-labs.io' using the certbot command as shown below.
certbot certonly --rsa-key-size 2048 --standalone --agree-tos --no-eff-email --email hakaselabs@gmail.com -d matrix.hakase-labs.io
The Letsencrypt tool will generate SSL certificate files by running the 'standalone' temporary web server for verification.
And when it's complete, you will get the result as shown below.
Generate SSL Letsencrypt Certificates
SSL certificate files for the matrix synapse domain name 'matrix.hakase-labs.io' is generated inside the '/etc/letsencrypt/live/' directory.

Step 5 - Install and Configure Nginx as a Reverse Proxy

In this step, we will install the Nginx web server and configure it as a reverse proxy for home server that is running on the port '8008'.
Install the Nginx web server using the apt command below.
sudo apt install nginx -y
After the installation is complete, start the service and enable it to launch everytime at system boot
sudo systemctl start nginx
sudo systemctl enable nginx
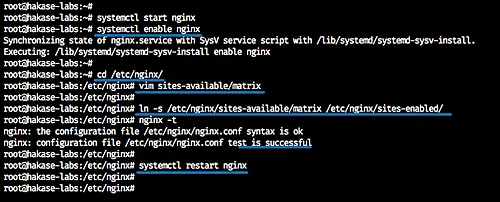
Next, we will create a new virtual host configuration for the matrix domain name 'matrix.hakase-labs.io'.
Go to the '/etc/nginx' configuration directory and create a new virtual host file 'matrix'.
cd /etc/nginx/
vim sites-available/matrix
Paste the following configuration there.
server {
       listen 80;
       server_name matrix.hakase-labs.io;
       return 301 https://$server_name$request_uri;
}

server {
    listen 443 ssl;
    listen [::]:443 ssl;
    server_name matrix.hakase-labs.io;

    ssl_certificate /etc/letsencrypt/live/matrix.hakase-labs.io/fullchain.pem;
    ssl_certificate_key /etc/letsencrypt/live/matrix.hakase-labs.io/privkey.pem;

    # If you don't wanna serve a site, comment this out
    root /var/www/html;
    index index.html index.htm;

    location /_matrix {
      proxy_pass http://127.0.0.1:8008;
      proxy_set_header X-Forwarded-For $remote_addr;
    }
}
Save and exit.
Activate the virtual host file and test the configuration.
ln -s /etc/nginx/sites-available/matrix /etc/nginx/sites-enabled/
nginx -t
Make sure there is no error, then restart the Nginx services.
sudo systemctl restart nginx
Nginx installation and configuration as a reverse proxy for the Matrix Synapse homeserver has been completed.
Configure Nginx

Step 6 - Setup UFW Firewall

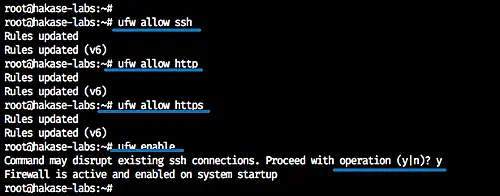
In this tutorial, we will only open three ports for our services. We will only allow SSH, HTTP, and HTTPS connection on the UFW firewall configuration.
Add the SSH, HTTP, and HTTPS services to the UFW firewall configuration by running the command below.
ufw allow ssh
ufw allow http
ufw allow https
setup UFW firewall
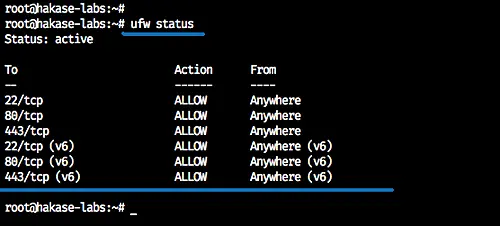
Now enable the UFW firewall service and then check the status.
 ufw enable
ufw status
And you will get the result as shown below.
Check Firewall status
And we've completed the UFW firewall configuration.

Step 7 - Create a New Matrix User

At this stage, the matrix synapse homeserver installation and configuration is complete. And in this step, we will show you how to add a new matrix user from the command line server.
To create a new matrix user, run the command below.
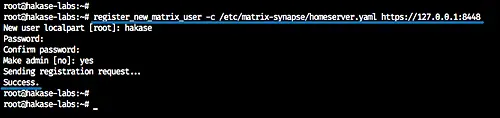
register_new_matrix_user -c /etc/matrix-synapse/homeserver.yaml https://127.0.0.1:8448
Now you need to input the user name, password, and decide whether the user will have the admin privileges or not.
Below is the result on my system.
Create a New Matrix User
And we have created a new matrix user named 'hakase' with admin privilege.

Step 8 - Testing

Download the Riot desktop application for your operating system and install it.
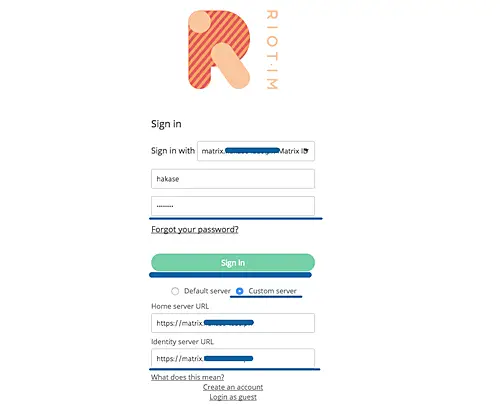
Open the Riot software and you will get the Matrix login page as below.
Test Matrix Synapse
Type the matrix username and password, then choose the 'Custom server' option and type the custom domain name 'matrix.hakase-labs.io'.
Click the 'Sign In' button.
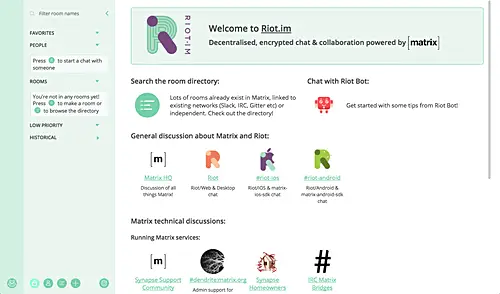
And now you will get the Riot Dashboard.
Riot Dashboard
The Matrix Synapse home server is up and running under the Nginx reverse proxy HTTPS connection, and the 'hakase' user is now logged in to the matrix homeserver using the Riot application desktop.
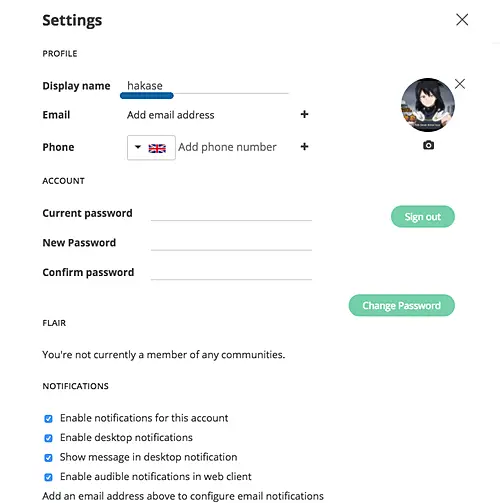
Matrix user configuration.
User settings
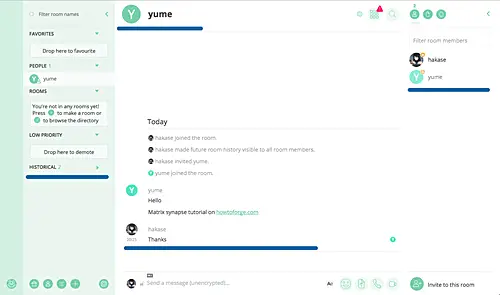
Matrix chat user as a Group.
Matrix Chat

Reference
Share:

Tuesday, May 5, 2020

How to Install Nagios Monitoring Software on Ubuntu 18.04 LTS

How to Install Nagios Monitoring Software on Ubuntu 18.04 LTS

This tutorial exists for these OS versions

On this page

  1. Step 1 - Install Packages Dependencies
  2. Step 2 - Install Nagios Core 4.4.5
    1. Download Nagios Core 4.4.5
    2. Compile and Install Nagios
    3. Create nagiosadmin user
    4. Setup UFW Firewall
  3. Step 3 - Install Nagios Plugins and NRPE Plugin
  4. Step 5 - Add Linux Host to Monitor
    1. Install NRPE Server on the Client01 Server
    2. Add Hosts Configuration to the Nagios Server
  5. Step 5 - Testing
  6. Reference

Nagios is open-source software for system and network monitoring. Nagios can monitor the activity of a host and its services and provides a warning/alert if something bad happens on the server. Nagios can run on Linux operating systems, and we will be using the Ubuntu 18.04 server.
In this tutorial, we will show you step by step installing the Nagios 4.4.x on Ubuntu 18.04. We will install the Nagios Core 4.4.x from source, install the nrpe and nagios plugins, and then add host to monitor to the Nagios server.
Prerequisites
  • 2 Ubuntu 18.04 servers
    • Nagios server - hostname: hakase-nagios with an IP: 10.5.5.11
    • Ubuntu client - hostname: client01 with an IP: 10.5.5.12
  • Root privileges
What we will do:
  • Install Packages Dependencies
  • Install Nagios Core 4.4.5
  • Install Nagios Plugin and NRPE Plugin
  • Add Host to Monitor to Nagios Server
  • Testing

Step 1 - Install Packages Dependencies

First, we will update the Ubuntu repository and install some packages dependencies for the Nagios installation.
Update the Ubuntu repository using the apt command below.
sudo apt update
After that, install packages dependencies for Nagios installation.
sudo apt install -y autoconf bc gawk dc build-essential gcc libc6 make wget unzip apache2 php libapache2-mod-php7.2 libgd-dev libmcrypt-dev make libssl-dev snmp libnet-snmp-perl gettext
And you've installed packages dependencies for Nagios server.

Step 2 - Install Nagios Core 4.4.5

In this step, we will install the latest stable version Nagios Core 4.4.5. And we will install it manually from the source.

Download Nagios Core 4.4.5

Go to your home directory and download the Nagios Core source code.
cd ~/
wget https://github.com/NagiosEnterprises/nagioscore/archive/nagios-4.4.5.tar.gz
Extract the Nagios package and go to the extracted Nagios directory.
tar xzf nagios-4.4.5.tar.gz
cd nagioscore-nagios-4.4.5/

Compile and Install Nagios

First, compile Nagios source code and define the Apache virtual host configuration for Nagios.
sudo ./configure --with-httpd-conf=/etc/apache2/sites-enabled
sudo make all
Compile Nagios
Create the Nagios user and group, and add the 'www-data' Apache user to the 'nagios' group.
sudo make install-groups-users
sudo usermod -a -G nagios www-data
Install groups and users
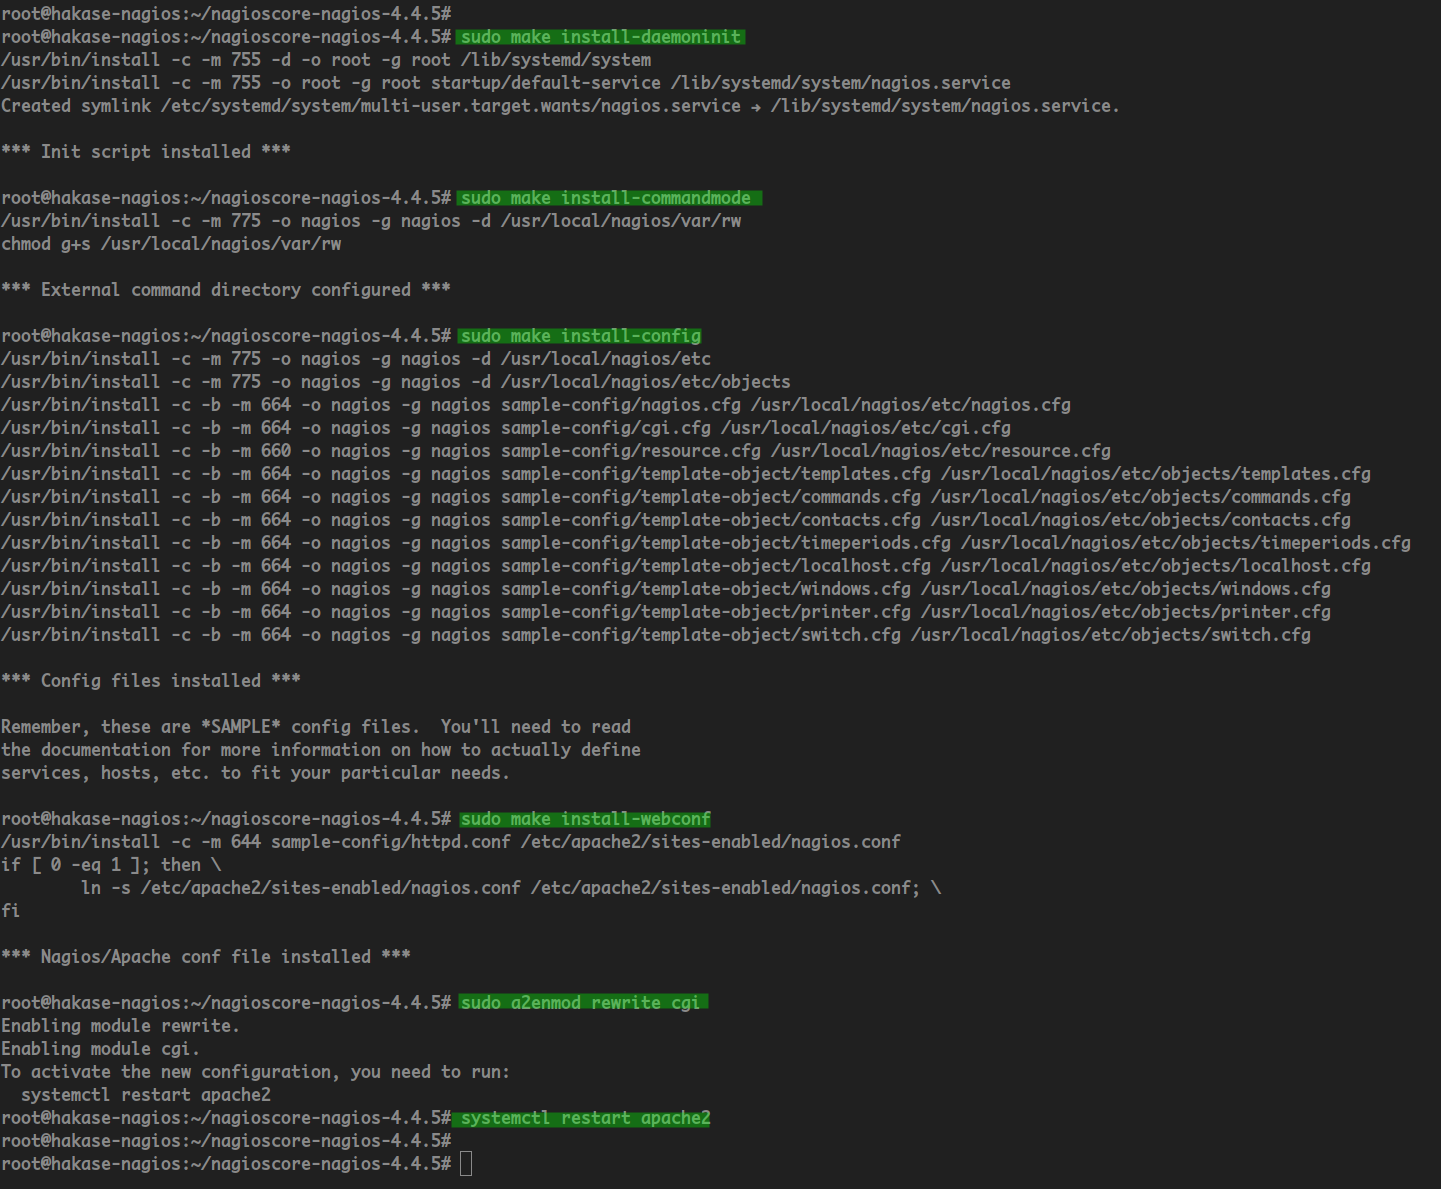
Install Nagios binaries, service daemon script, and the command mode.
sudo make install
sudo make install-daemoninit
sudo make install-commandmode
After that, install the sample script configuration.
sudo make install-config
Then install the Apache configuration for Nagios and activate the mod_rewrite and mode_cgi modules.
sudo make install-webconf
sudo a2enmod rewrite cgi
Now restart the Apache service.
systemctl restart apache2
And you've installed the Nagios Core 4.4.5.
Install Nagios Configuration

Create nagiosadmin user

After installing the Nagios Core, we will add the basic authentication for accessing the Nagios dashboard. And we will be using the basic Apache authentication.
Create a new apache basic authentication for the user the "nagiosadmin".
sudo htpasswd -c /usr/local/nagios/etc/htpasswd.users nagiosadmin
Type your strong password.
Set password for Nagios admin
And you've created a new user 'nagiosadmin' for the Nagios dashboard authentication.

Setup UFW Firewall

For the firewall configuration, you will need to add the Apache service and the Nagios server port to the UFW firewall.
Add the Apache HTTP port and the Nagios port '' using the ufw command below.
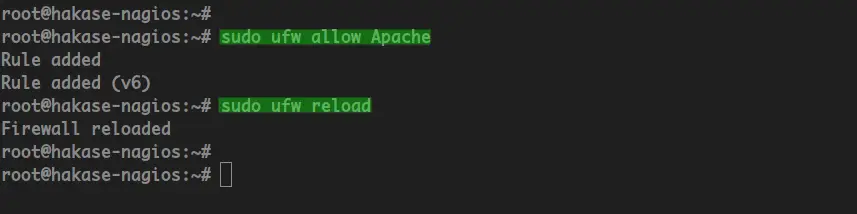
sudo ufw allow Apache
Now reload the UFW firewall.
sudo ufw reload
And you've completed the Nagios Core installation on the Ubuntu 18.04 server.
Configure UFW Firewall

Step 3 - Install Nagios Plugins and NRPE Plugin

After installing the Nagios Core, we will install the Nagios Plugins and NRPE Plugins.
Both Nagios and NRPE plugins are available by default on the Ubuntu repository. You can install those packages using the apt command below.
sudo apt install nagios-plugins nagios-nrpe-plugin
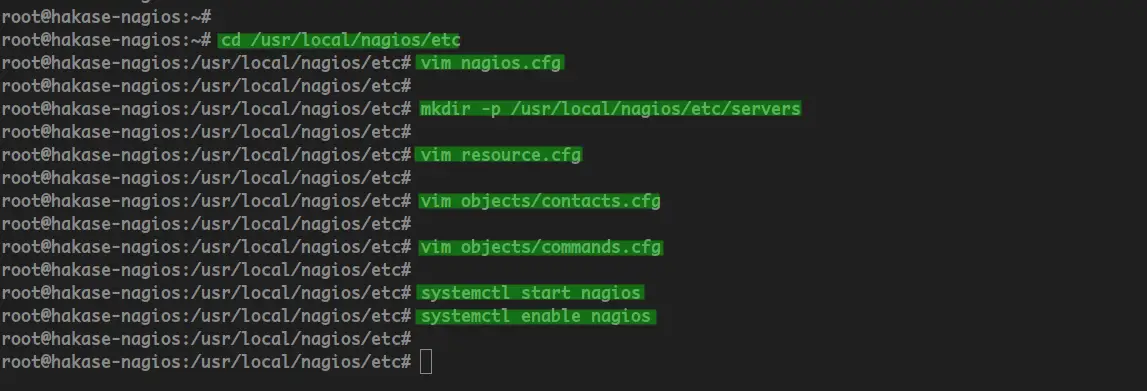
Once the installation is complete, go to the nagios installation directory "/usr/local/nagios" and edit the configuration file "nagios.cfg".
cd /usr/local/nagios/
vim nagios.cfg
Uncomment the additional config directory for servers.
cfg_dir=/usr/local/nagios/etc/servers
Save and close.
Now create a new directory "/usr/local/nagios/etc/servers" that will be used for storing the configuration of host monitor.
mkdir -p /usr/local/nagios/etc/servers
After that, go to the "/usr/local/nagios/etc/" directory and edit the configuration file "resurces.cfg".
cd /usr/local/nagios/etc/
vim resources.cfg
Change the default directory for Nagios plugins as below.
$USER1$=/usr/lib/nagios/plugins
Save and close.
Next, add the nagios admin contacts by editing the configuration file "objects/contacts.cfg".
vim objects/contacts.cfg
Change the email address with your own.
define contact{
        ......
        email             email@host.com
}
Save and close.
Next, define the nrpe check command by editing the configuration file "objects/commands.cfg".
vim objects/commands.cfg
Paste the following configuration to the end of the line.
define command{
        command_name check_nrpe
        command_line $USER1$/check_nrpe -H $HOSTADDRESS$ -c $ARG1$
}
Save and close.
Now start the Nagios service and add it to the system boot.
systemctl start nagios
systemctl enable nagios
Configure nagios, then restart it to apply changes
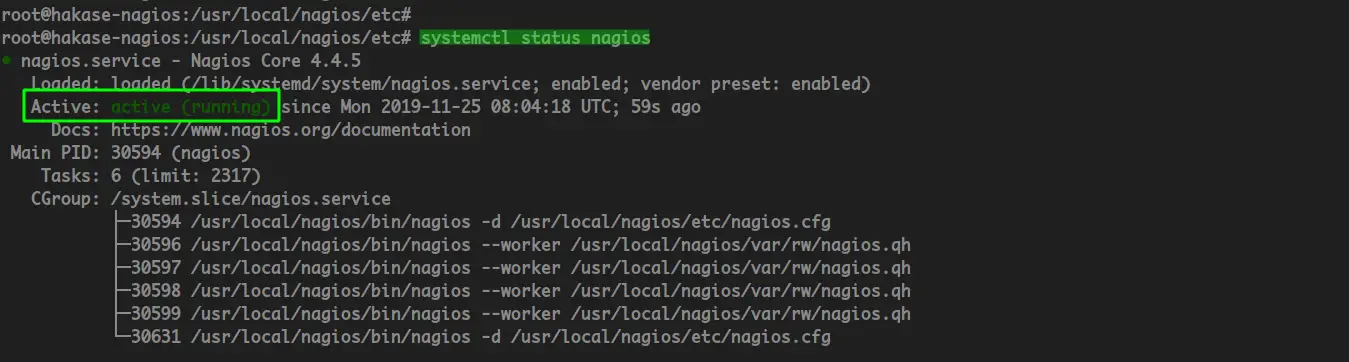
The Nagios service is up and running, check using the following command.
systemctl status nagios
Below is the result.
Check nagios Status
Next, we need to restart the Apache service to apply a new Nagios configuration.
systemctl restart apache2
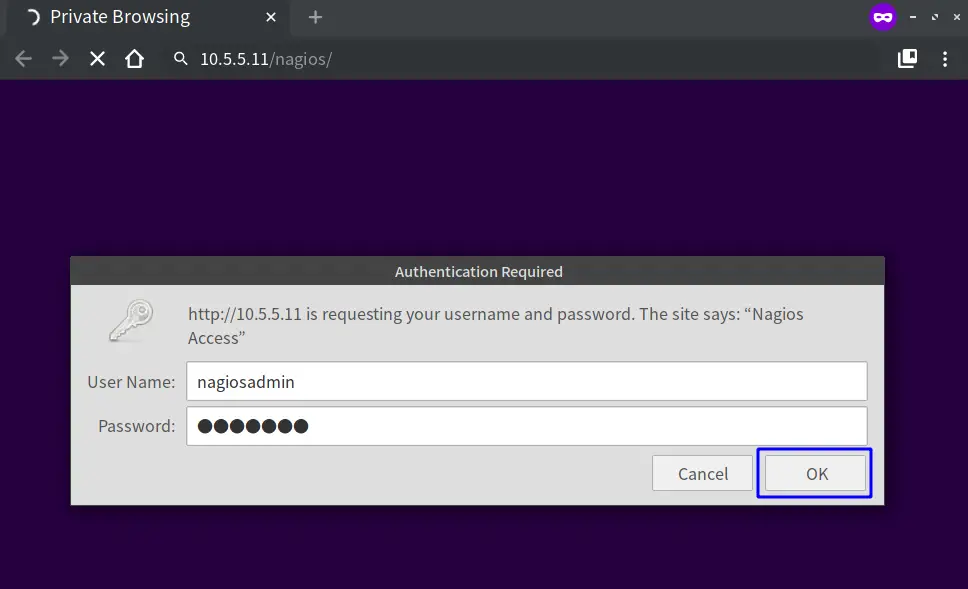
After that, open your web browser and type the server IP address following the "nagios" URL path.
http://10.5.5.11/nagios/
Log in with the user "nagiosadmin" and type your password.
Nagios Login
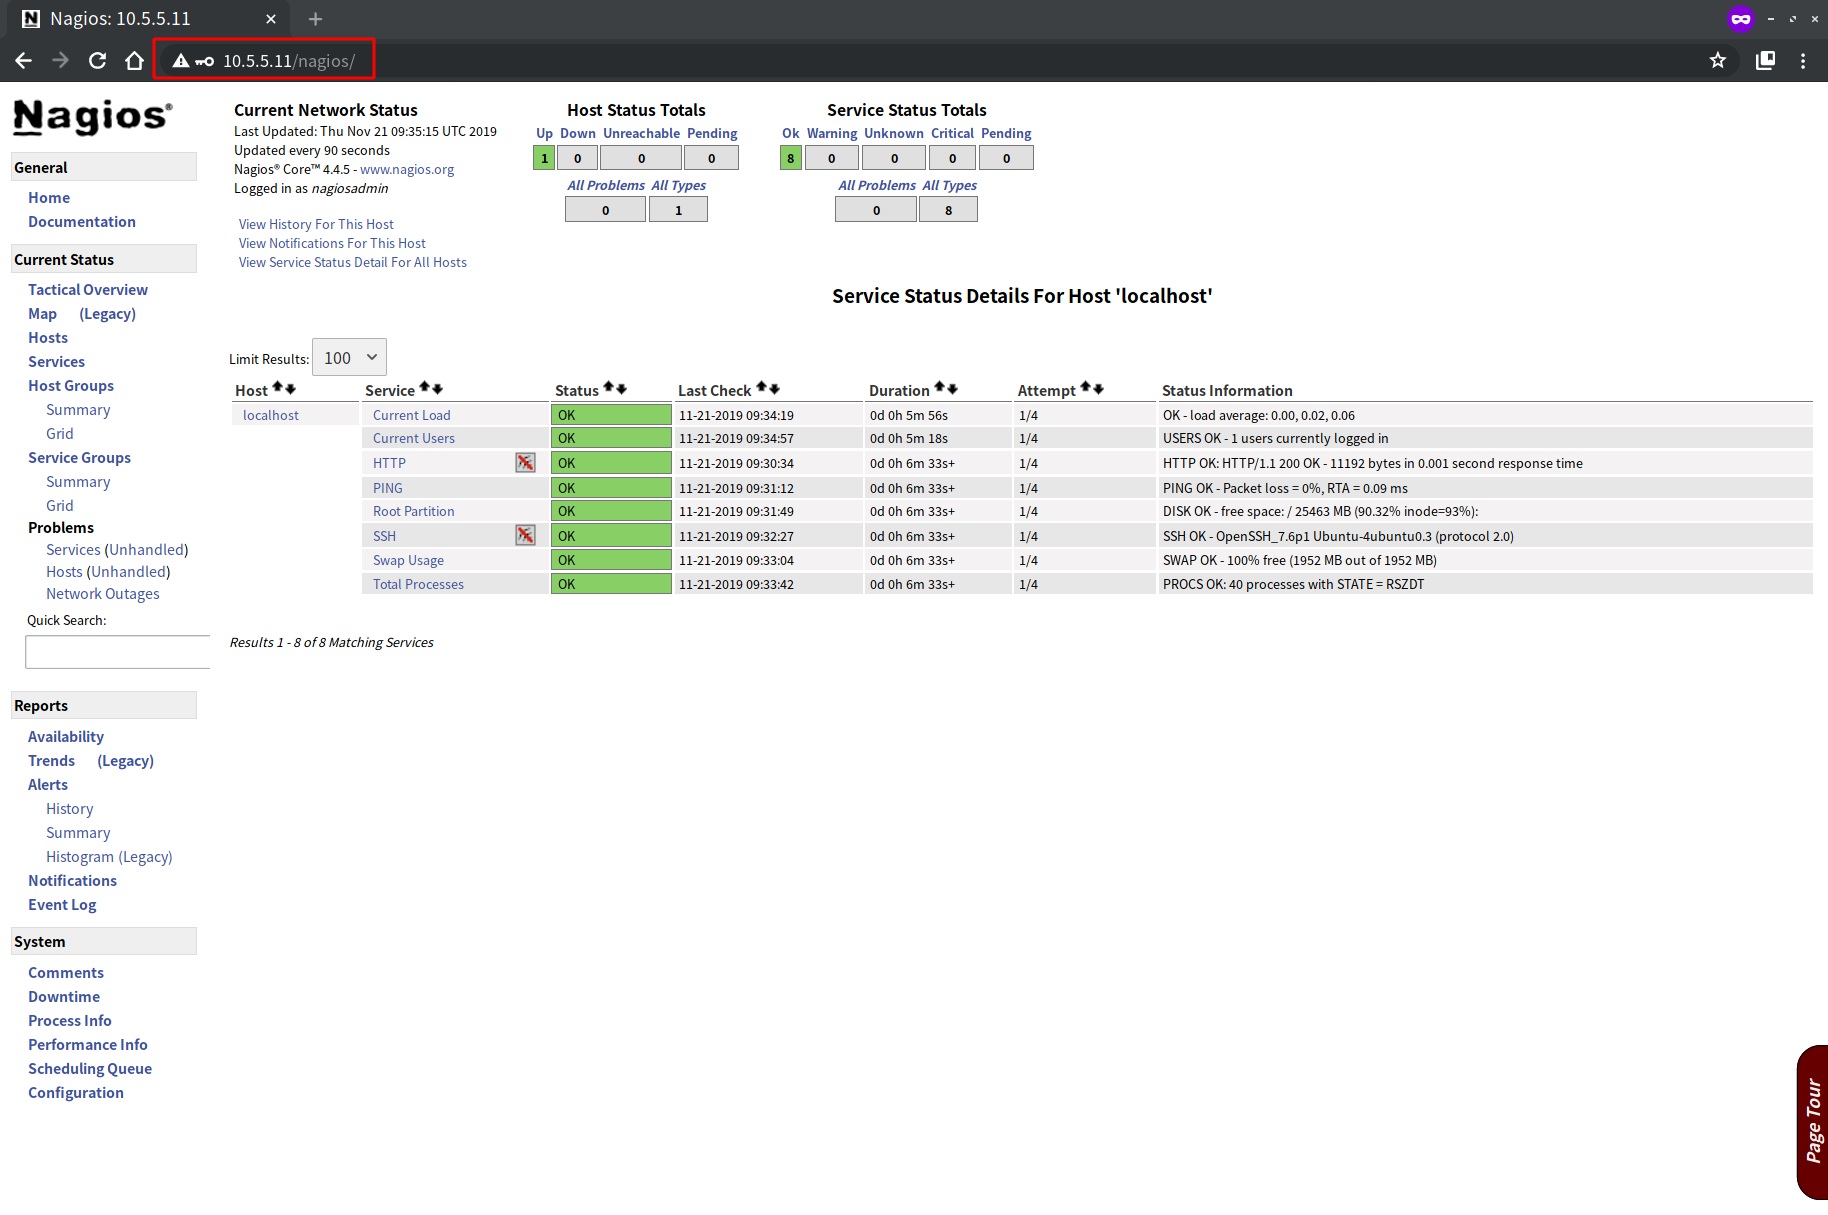
And you will get the Nagios Dashboard as below.
Advertisements
Nagios dashboard
As a result, you've installed Nagios on the Ubuntu 18.04 server. And you're able to add hosts to the Nagios server.

Step 5 - Add Linux Host to Monitor

In this step, we will add the Ubuntu server with hostname "client01" and the IP address "10.5.5.12" to the Nagios server.

Install NRPE Server on the Client01 Server

Log in to the "client01" server using your ssh.
ssh root@10.5.5.12
Once you've logged in, update the Ubuntu repository and install Nagios Plugins and NRPE Server.
sudo apt update
sudo apt install nagios-nrpe-server nagios-plugins
Next, go to the NRPE installation directory "/etc/nagios" and edit the configuration file "nrpe.cfg".
cd /etc/nagios/
vim nrpe.cfg
Uncomment the "server_address" line and change the value with the "client01" IP address.
server_address=10.5.5.12
One the "allowed_hosts" line, add the Nagios Server IP address "10.5.5.11".
allowed_hosts=127.0.0.1,::1,10.5.5.11
Save and close.
Next, edit the "nrpe_local.cfg" configuration.
vim nrpe_local.cfg
Change the IP address with the "client01" IP address, and paste the configuration into it.
command[check_root]=/usr/lib/nagios/plugins/check_disk -w 20% -c 10% -p /
command[check_ping]=/usr/lib/nagios/plugins/check_ping -H 10.5.5.12 -w 100.0,20% -c 500.0,60% -p 5
command[check_ssh]=/usr/lib/nagios/plugins/check_ssh -4 10.5.5.12
command[check_http]=/usr/lib/nagios/plugins/check_http -I 10.5.5.12
command[check_apt]=/usr/lib/nagios/plugins/check_apt
Save and close.
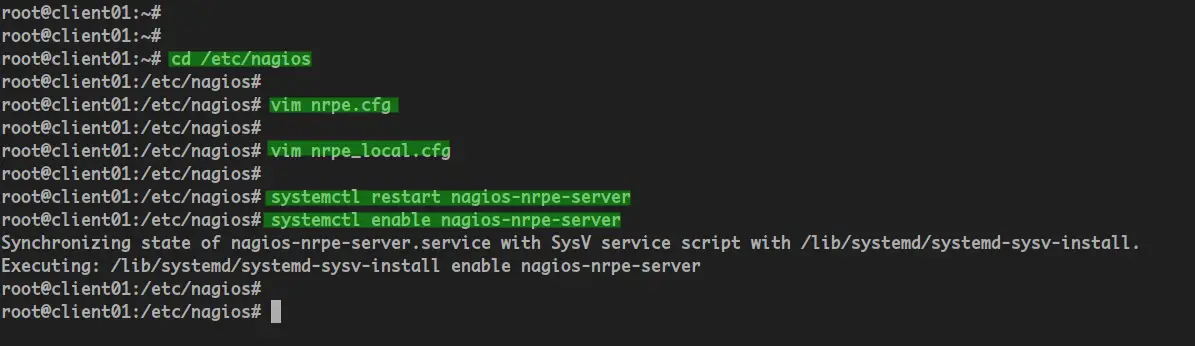
Now restart the NRPE service and add it to the system boot.
systemctl restart nagios-nrpe-server
systemctl enable nagios-nrpe-server
And the Nagios NRPE server is up and running.

Install NRPE
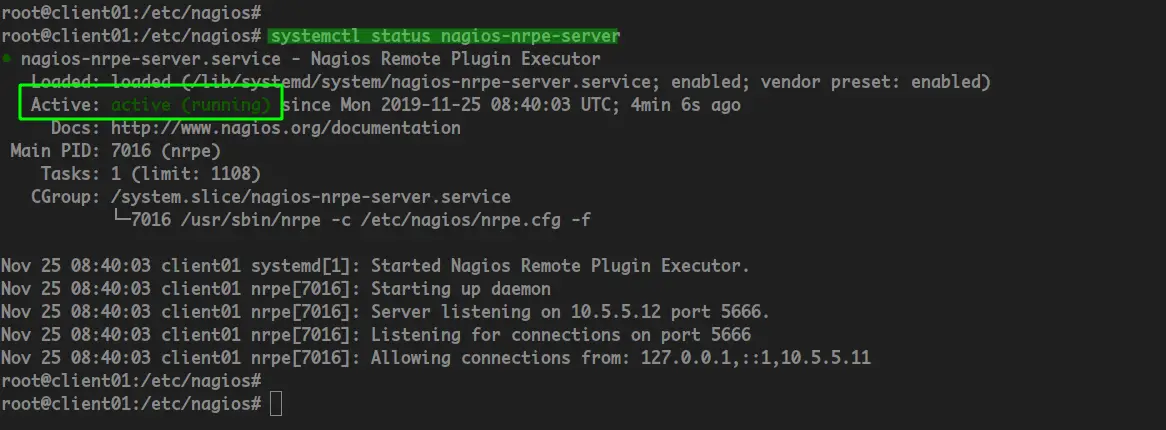
Check the NRPE service using the following command.
systemctl status nagios-nrpe-server
The NRPE service is up and running.
NRPE Server is active and running
Next, back to the Nagios Server and check the "client01" NRPE server.
/usr/lib/nagios/plugins/check_nrpe -H 10.5.5.12
/usr/lib/nagios/plugins/check_nrpe -H 10.5.5.12 -c check_ping
And you will get the result as below.
Check NRPE
And you've installed the Nagios NRPE Server and Nagios Plugins on the "client01" host.

Add Hosts Configuration to the Nagios Server

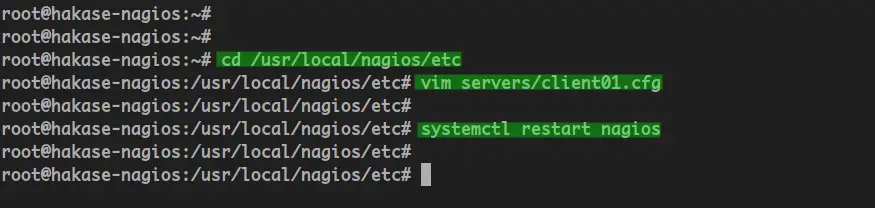
Back to the Nagios server terminal, go to the "/usr/local/nagios/etc" directory and create a new configuration "server/client01.cfg".
cd /usr/local/nagios/etc
vim servers/client01.cfg
Change the IP address and the hostname with your own and paste the configuration into it.
# Ubuntu Host configuration file1

define host {
        use                          linux-server
        host_name                    client01
        alias                        Ubuntu Host
        address                      10.5.5.12
        register                     1
}

define service {
      host_name                       client01
      service_description             PING
      check_command                   check_nrpe!check_ping
      max_check_attempts              2
      check_interval                  2
      retry_interval                  2
      check_period                    24x7
      check_freshness                 1
      contact_groups                  admins
      notification_interval           2
      notification_period             24x7
      notifications_enabled           1
      register                        1
}

define service {
      host_name                       client01
      service_description             Check Users
      check_command                   check_nrpe!check_users
      max_check_attempts              2
      check_interval                  2
      retry_interval                  2
      check_period                    24x7
      check_freshness                 1
      contact_groups                  admins
      notification_interval           2
      notification_period             24x7
      notifications_enabled           1
      register                        1
}

define service {
      host_name                       client01
      service_description             Check SSH
      check_command                   check_nrpe!check_ssh
      max_check_attempts              2
      check_interval                  2
      retry_interval                  2
      check_period                    24x7
      check_freshness                 1
      contact_groups                  admins
      notification_interval           2
      notification_period             24x7
      notifications_enabled           1
      register                        1
}

define service {
      host_name                       client01
      service_description             Check Root / Disk
      check_command                   check_nrpe!check_root
      max_check_attempts              2
      check_interval                  2
      retry_interval                  2
      check_period                    24x7
      check_freshness                 1
      contact_groups                  admins
      notification_interval           2
      notification_period             24x7
      notifications_enabled           1
      register                        1
}

define service {
      host_name                       client01
      service_description             Check APT Update
      check_command                   check_nrpe!check_apt
      max_check_attempts              2
      check_interval                  2
      retry_interval                  2
      check_period                    24x7
      check_freshness                 1
      contact_groups                  admins
      notification_interval           2
      notification_period             24x7
      notifications_enabled           1
      register                        1
}

define service {
      host_name                       client01
      service_description             Check HTTP
      check_command                   check_nrpe!check_http
      max_check_attempts              2
      check_interval                  2
      retry_interval                  2
      check_period                    24x7
      check_freshness                 1
      contact_groups                  admins
      notification_interval           2
      notification_period             24x7
      notifications_enabled           1
      register                        1
}
Save and close.
Now restart the Nagios Server.
systemctl restart nagios
Configure Nagios Client

Step 5 - Testing

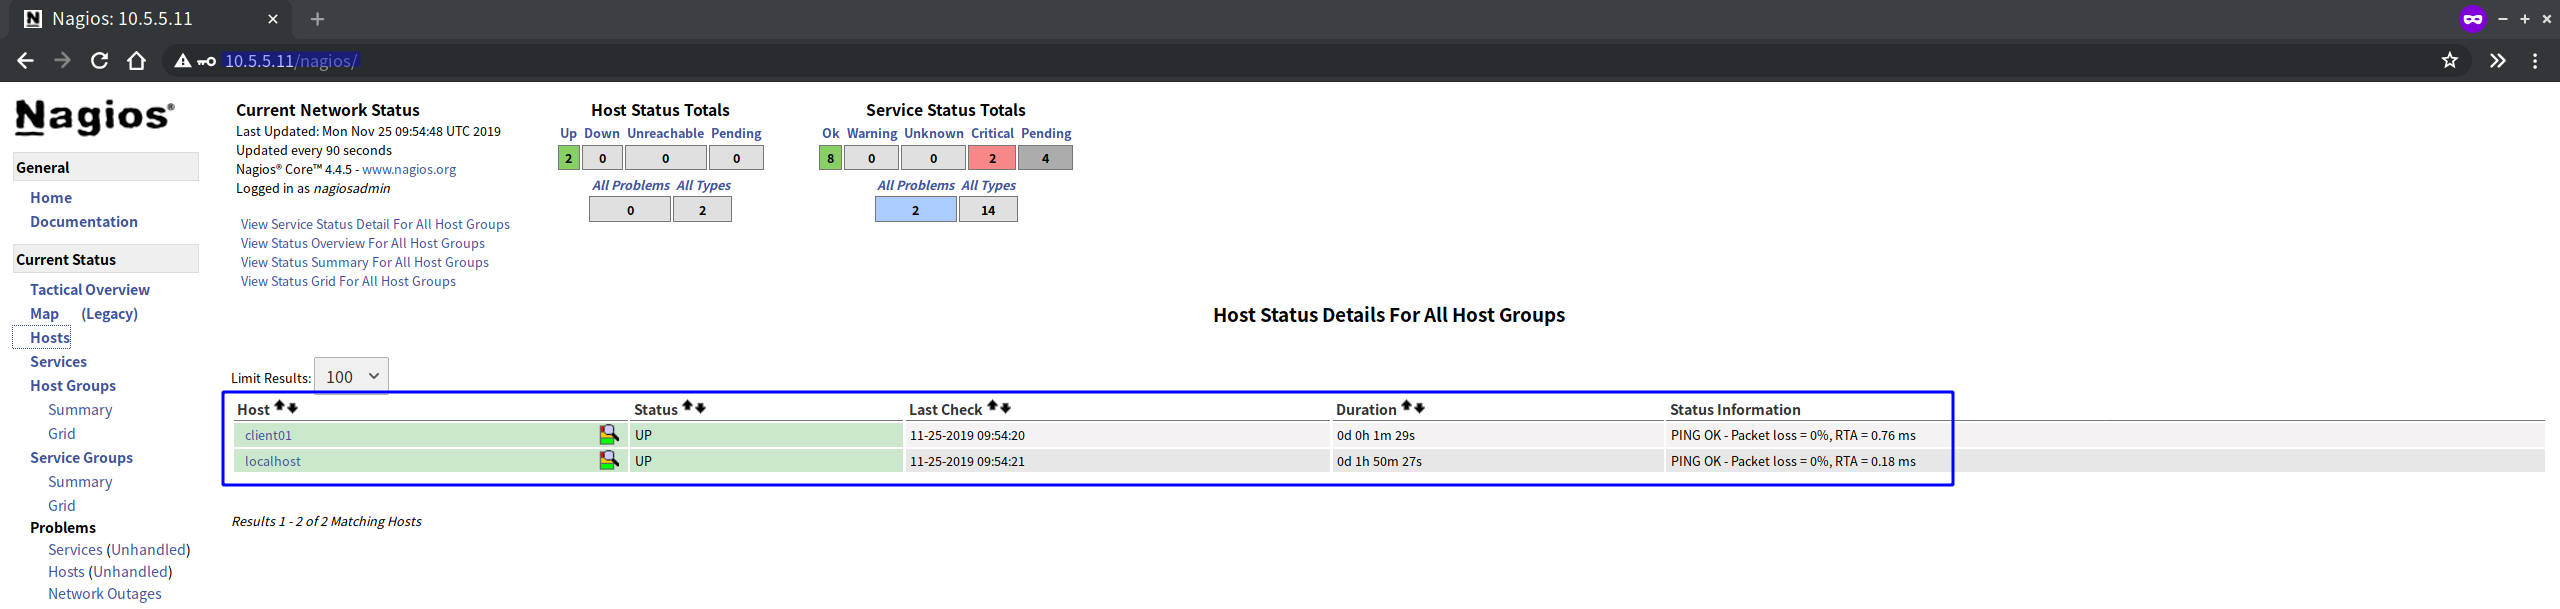
Back to your browser and wait for some minutes.
Click on the "Hosts" menu and you will get the "client01" has been added.
Testing Nagios
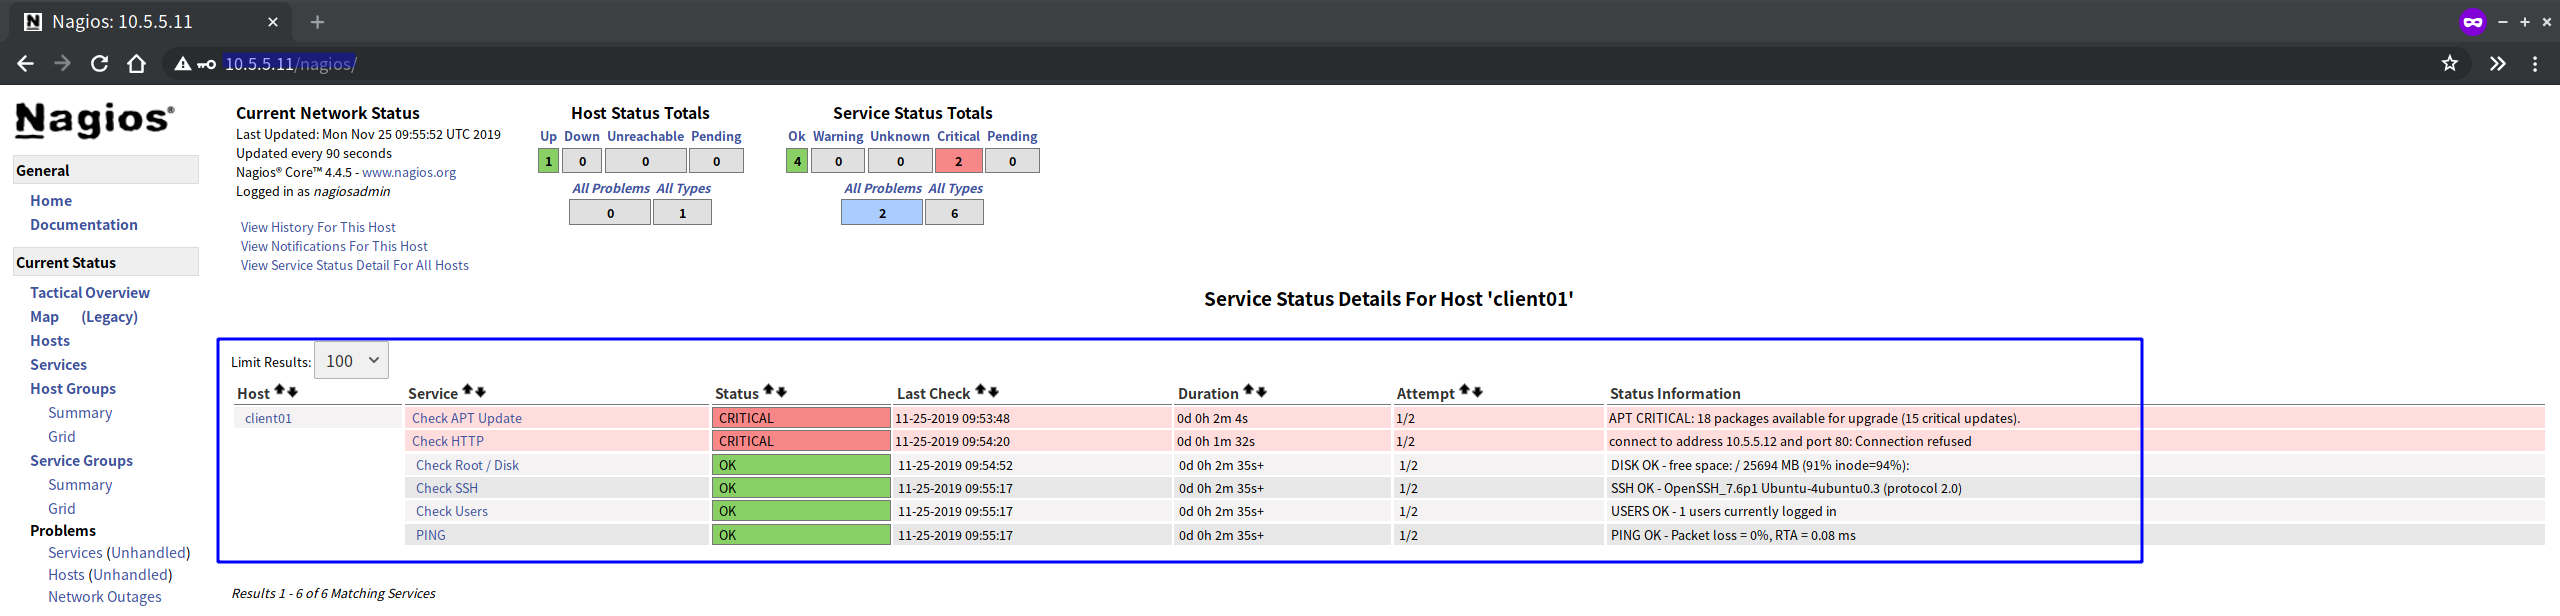
Below are details monitoring about the "client01" server.
Another Nagios Test
Now you've added Host to monitor to the Nagios Server.
And the installation of Nagios 4.4.5 on Ubuntu 18.04 Server has been completed successfully.

Reference

Share:

Search This Blog

Blog Archive
Nerdy Tech Tips. Powered by Blogger.

How to Install InvoicePlane

  How to Install InvoicePlane with Apache and Free Let's Encrypt SSL Certificate on Debian 11 On this page Prerequisites Install Apache,...

Blogger templates